Tuesday 21 October 2014

Major Clitheroe's Battlefield Tours - No.1 The Battle of Longhope 1938 - another repost from my old website

Major Clitheroe's Battlefield Tours
A Tour in the Summer of 2012 visiting the site of the Battle of Longhope - 11th July 1938

Background
In the summer of 1938, Longhope was in the no-mans' land between government forces at Gloucester and Anglican League forces at Ross. 
On 10th July, British Union of Fascists (BUF) militia arrived at the Longhope Jam Factory and demanded a large quantity of jam. The factory owner would not hand it over for a promissory note. The BUF got a little aggressive. The employees, led by their Union, went on strike and refused to work if any jam was given or sold to the fascists. The BUF left threatening to come back and take all the jam by force if necessary.
The BUF militia attacked the Jam Factory but were pushed back & requested support from their Royalist allies, by the time reinforcements arrived the BUF had been routed and left.  The Royalists advanced into the west end of the village pushing the Local Defence Volunteers (LDV) back. The Vicar contacted Anglican League (AL) forces a few miles west of Longhope and these extra troops halted the Royalist advance.  The arrival of men from the Loyal Punjab Regiment swung the battle in favour of the Royalists but as they were running low on ammunition and both their armoured cars had been damaged, the Royalist Commander called for a truce and both sides withdrew from the village.

Map of the battlefield


The Jam Factory


The Jam Factory building was demolished some years ago and the site is now taken up by the modern building of the Longhope Welding Company.

The Bridge 

The house to the east of the bridge which became the Royalist Headquarters during the battle. The white building in the centre right of the picture is a house built on the sawmill site.

The BUF armoured truck burning on the old bridge after being hit by molotovs thrown by the Jam Factory Defence Militia.


A view looking east, showing the modern bridge that replaced the one damaged in the fighting.  The man on the left of the picture is standing where the Jam Factory defenders barricade was built.

The Stream and Jam Factory Defences

 A BUF mounted section attacked from the north east side, jumping the hedge and landing in the stream with half of them falling off their horses. They were then fired upon and hit by two molotovs. The BUF cavalry routed, smoking slightly.
 
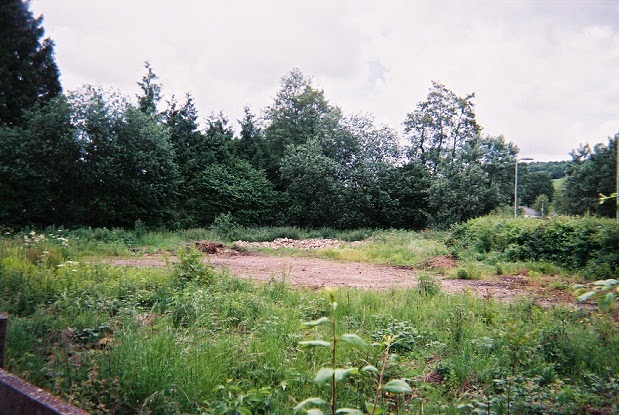
 The area covered by the Jam Factory defences is now wasteland but the double line of trees to the rear of the photograph shows the position of the hedge line and stream  where the BUF cavalry made their ill-judged charge.


The Church

A long view showing the arrival of the AL forces (on 'blinds'), after being called by the Vicar.
  
The church whose tower acted as Headquarters for the AL forces in the battle.
      

The Reverend  Owen Littlejohn, Vicar of Longhope and an LDV commander during the conflict.

The Orchard
                 
AL forces in the west (their cavalry moving up on the left flank) and Royalist forces consolidating (at the top of the photograph) with a coach carrying men from the Loyal Punjab Regiment arriving.


The orchard where the AL cavalry met their end has now been built on.

The Main Road

An over keen section of the Gloucestershire Hussars (GH) opens fire on a Longhope LDV position, breaking the first truce! The Royalists advance west along the road to Ross.

These houses were not damaged in the fighting, as both sides respected the safety of the civilians who were sheltering in them.


The Road Junction

The point of the furthest advance by AL forces where there was a strongly contested engagement between the armoured cars of both sides.


The road junction which became a major traffic jam due to the narrowness of the turn. This spot saw the heaviest fighting of the battle. The cars and buildings behind the horse at the rear of the picture occupy the site of the sawmill that also saw significant action.

Major Clitheroe would like to thank Mr R. Knox and Mr C. Mann for providing photographic images of the tour.

Battle of Longhope - 11th July 1938

Battle of Longhope - 11th July 1938
Background:
Longhope is in the no-mans' land between government forces at Gloucester and Anglican League forces at Ross.
Longhope village has a centre of larger houses and shops whose residents are inclined towards the Royalist side. To the west is the'industrial' part of the village with its sawmill and jam factory and a little to the north is a small quarry. Here the locals are more centre left & liberal supporters who dislike the King & his government. The vicar of the church at the western end of the village is pro-Anglican League and has contacts in nearby Ross. The women of the Jam Factory Union lean further left in their politics but work within the LDV framework.
On 10th July, BUF militia arrived at the Longhope Jam Factory & demanded a large quantity of jam. The factory owner would not hand it over for a promissory note. The BUF got a little aggressive. The employees, led by their Union, went on strike and refused to work if any jam was given or sold to the fascists. The BUF left threatening to come back and take all the jam by force if necessary.
Map of the battlefield:

Forces involved:
The Royalist/Government Gloucester Hussars and attached sections maintain a forward base at Huntley (about 3 miles east of Longhope).
Gloucestershire Constabulary: 1 section armed Police
British Union of Fascists Militia: 1 mounted section, 1 infantry section in Lancia armoured truck, 1 HMG in car
Royalist forces: 1 Command section in staff car, 1 TA infantry section in truck 
Gloucestershire Hussars: 2 Rolls Royce Armoured cars, 1 Carden-Lloyd carrier, 2 mounted sections
Reinforcements: 1 section Loyal Punjab Regt with 1 Boyes Rifle team, 1 Carden-Lloyd carrier, 1 TA infantry section in truck, 1 mounted section, 1 section RAF Rifles, 1 RAF short 3-pounder on truck

The Anglican League forces based at Ross have a strong observation unit which is positioned at Lea Line (2.5 miles west of Longhope).
Ross Anglican League forces: 1 Command section in van, 2 militia infantry sections in trucks, 1 improvised Armoured car with HMG, 1 improvised Armoured car with 3-pounder gun, 1 TA infantry section in truck, 1 TA HMG section in truck, 1 militia Boyes Anti-Tank rifle team in car

The Warren James Centuria (Independent Labour Party militia) made up of miners, foresters and agricultural workers is close by at Mitcheldean (about 1.75 miles away)
Warren James Centuria:- 1 black powder muzzle loading cannon in truck, 2 workers militia sections in trucks.

The local defenders:
Longhope LDV (West group) - 2 militia infantry sections, plus 1 section (all female - except Bert the truck driver) Longhope Jam Factory Section

The Engagement:
Action commenced 12.20 hours
Two Longhope LDV sections were stationed near the church, the Jam Factory section at the factory.

The Constabulary (in a truck) drove onto the bridge which was blocked by a barricade (wo)manned by the Jam Factory section (JFS). The Police politely requested that the road be unblocked as it was a public highway. The barrier was removed and the Police proceeded west.

Shortly afterwards, a British Union of Fascist (BUF) militia car and armoured truck arrived. They were stopped on the bridge and asked to leave. They drove forwards so the JFS opened fire killing the men in the car which crashed into the hedge. As the armoured truck came over the bridge, it was hit by two molotovs and burst into flames.


A BUF infantry section (previously disembarked from the armoured truck) approached from the sawmill to the south and was hit by LMG fire. A BUF mounted section attacked from the north side, jumping the hedge and landing in the stream with half of them falling off their horses. They were then fired upon and hit by two molotovs. The BUF cavalry routed, smoking slightly. The BUF infantry section phoned for army support using the sawmill phone. Strong and accurate fire by the JFS caused more casualties and the BUF retreated from the scene. The JFS capture a HMG from the BUF car.
.

The other Longhope LDV sections move towards the sawmill and jam factory. The JFS phone their allies from the Warren James Centuria (WJC) who arrive from the south, most of their number stopping in the Red Lion pub on the way. The badly parked Police van nearly causes an accident at the telephone box junction.

The Royalist reinforcements arrive well after the BUF have fled but still attack the LDV in the sawmill. The RAF Rifles retreat with heavy casualties from the LDV Lewis gun but the LDV break under pressure from a TA section and rout.

The LDV, WJC and JFS fall back down the main road.

Having cleared the bridge of the burnt out hulk of the BUF Lancia, the Gloucestershire Hussars' (GH) armoured vehicles advance past the sawmill.
.
The Government forces see the enemy rout to the traffic jam at the road junction. In the foreground (left picture) is the WJC truck which was hit by RAF shellfire causing severe casualties.

A long view showing the arrival of the Anglican League (AL) forces (on 'blinds'), after being called by the Longhope Vicar.
AL forces in the west (their cavalry moving up on the left flank) and Royalist forces consolidating (at the top of the photo) with a coach carrying men from the Loyal Punjab Regiment arriving.

Between the lines, the brave Police Sergeant Williams successfully negotiates a truce to avoid unnecessary damage to civilians and houses.

An over keen section of the GH opens fire on a Longhope LDV position, breaking the truce! The Royalists advance west along the road to Ross.
The Police retreat to the Red Lion pub where they spend the rest of the battle playing darts against a WJC section which failed to pass the pub on its way into the village. The WJC section's sole contribution to the battle being a burst of fire from the captured BUF HMG which made its way to the pub's bay window.
.

The AL armoured cars hold the line and the one armed with a 3-pounder gun damages the turrets and HMGs on both Royalist Rolls Royces. The AL infantry are pushed back by the experienced Punjabis. One Rolls tries to head toward the Red Lion but is hit by molotovs from the LDV and set alight. As it tries to escape, it knocks over the phone box and grounds itself on the wreckage.
Both sides are running short of ammunition and the Royalist commander realised that whilst he has the upper hand, he cannot hold the village. He telephones the Vicar and arranges a truce. Before leaving the Jam Factory, the Royalist fill one car and half a truck with cases of prize-winning jam to take home.
The engagement ends at 17.30 with Royalist and Anglican League forces withdrawing from the village under truce conditions that allowed both sides to remove their wounded. Longhope LDV units left to defend the area (and pick up the pieces).